How to Add a PTZOptics Camera to OBS
This guide that will explain the many ways to add your PTZOptics camera to OBS as a video source.
Getting started
If you have already set up your camera on the network and are able to reach the web UI of the camera, great, you're nearly ready to start streaming! If not, that's fine, just follow this guide to get caught up to speed: Guide to Setting Up a PTZOptics Camera on a Network.
What You'll Need
- OBS Studio installed (Windows/Mac/Linux)
- PTZOptics camera connected (via USB, HDMI/SDI, or IP)
- PTZOptics camera IP address (if using network)
- (Optional) PTZOptics apps or plugins (e.g., PTZOptics NDI HX driver, VISCA control app)
Option 1 (Our Favorite): IP
To add your camera over the network via IP, you will need to have the camera plugged into either your computer or network with an ethernet cable. Once your camera is connected to the network and you are able to find the IP address move on to step 1
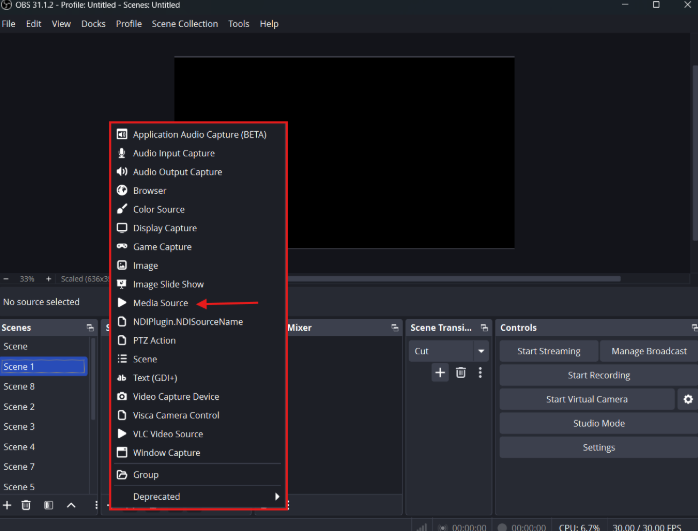
Step 1: click the "+" button to add a source
Open OBS on your computer and find where your sources dock is in OBS. Left click the "+" button to open up the source options menu.

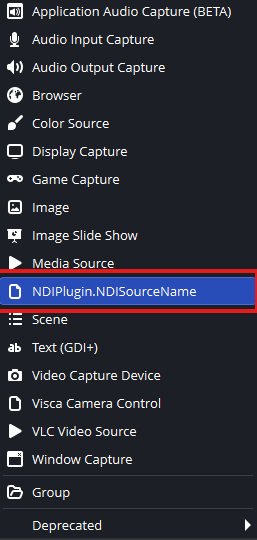
Step 2: Choose media source.
Move your mouse over to the option that says "Media Source" and left click on it.
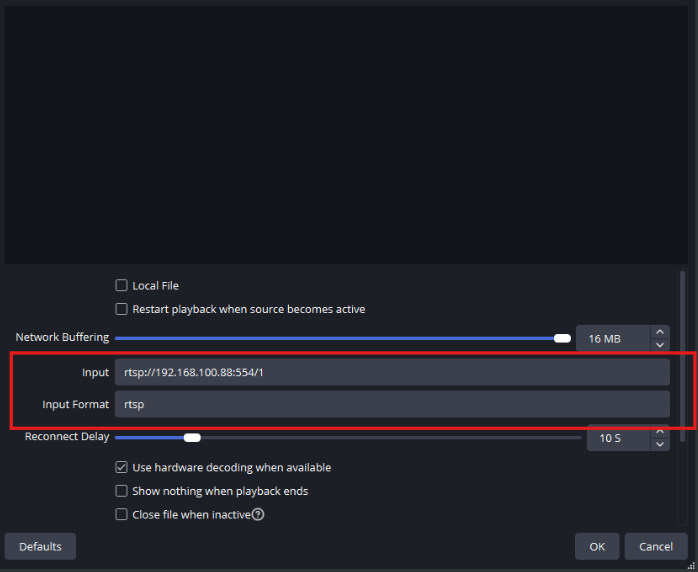
Step 3: Input the RTSP URL
Once you are in the properties page for your new media source, uncheck local file and input the RTSP URL of your camera. Follow this structure for the URL: rtsp://camera-ip:554/1. Just make sure to replace the part that says "camera-ip" with the IP address of your camera. Once that is done, simply click "OK" and in a moment your camera should appear in the preview screen.
Option 2: NDI
To add your PTZOptics camera to OBS using NDI, we'll need to take advantage of NDI tools and an OBS plugin that was specifically made for this purpose. First, head to NDI.video and download NDI tools 6 (as of 9/12/25) or the newest version. Next, head to the plugin download here: NDI Plugin for OBS and you should see this page:
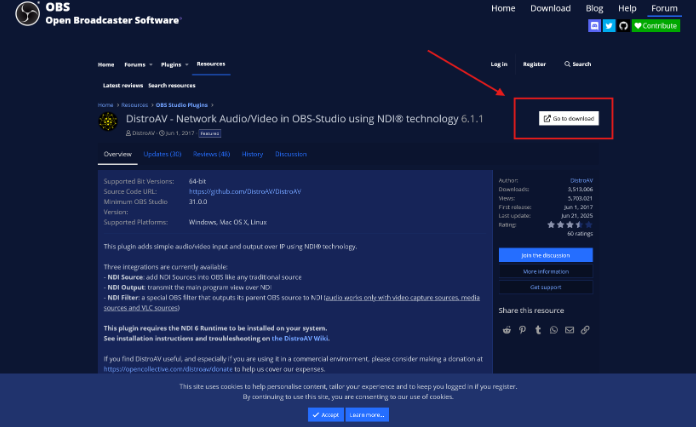
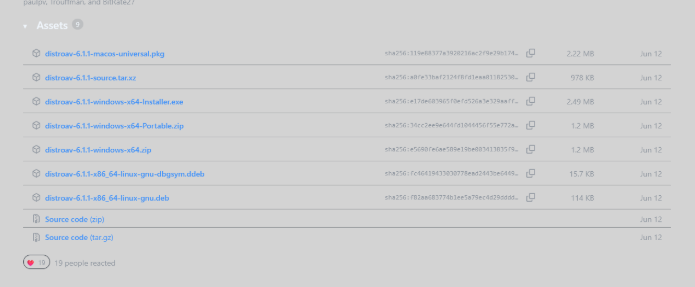
Once you're on this page click on the highlighted button that says "Go to Download". Scroll to the bottom of the download page until you find the "Assets" section. Choose your desired file and download it. (MAKE SURE OBS IS CLOSED/NOT RUNNING) Installation steps may vary, but once installed you should be able to open OBS up and see an option in your sources to add NDI sources.
Once you have the plugin installed you can open OBS and go to the sources menu. The source title may vary depending on what version of the NDI plugin you are using, but it should look something like this:
Once you click that, a pop up should appear, make sure "create new" is selected, then press "OK". Now the properties menu should appear. Use the dropdown menu to select your camera as an NDI source then click "OK". ![[Pasted image 20250926123628.png]]
Option 3: Capture Card
For this method I will be using an AVMatrix SDI/HDMI to USB C converter as an example, but you can also use the capture card or device of your choice.

In any capture device setup you will need to connect the camera to the "in" of the device, either with SDI or HDMI and then you will connect the "out" of the capture device to your computer. Once you have the capture card set up, go to the source selection menu and choose "Video Capture Device"
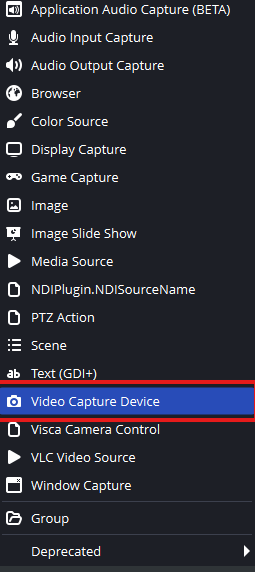
Left click Video Capture Device and create a new source, then in properties, choose your device from the "Device" dropdown menu.
Setting up OBS to issue camera commands when switching scenes.
This is possible using the HTTP triggers available in OBS. The article walking you through this is linked below.
Controlling the camera from within OBS
You can also get control from within OBS using our free control software. We have a few different applications and methods of controlling the cameras.
You can go to the camera control application page on PTZoptics.com and there we have numerous control applications. The OBS Plugin for PTZOptics? is the one you would want for this application. Once you click that and enter in your information, you should be greeted with this page. You can use our OBS controller for MAC or Windows, or you can use the Dockable controllers. The difference is that the OBS app is just like our standalone app but sits on top of OBS and can be turned on or off from within the Tools section of OBS. The Dockable controllers can be put into the GUI of OBS itself.

Using the OBS App
If you use the Windows or MAC OBS app you have to follow the instructions in the readme. You just move (3) files to one location on the obs-studio folder, and the imageformats folder to another location in there, that is all spelled out in the Readme. Once that is complete, you should be able to go to Tools, and see PTZOptics Camera Controller listed. If you select it, that will bring up your controller.
To use the controller you would have to have your camera on the network first, and then you can enter its IP address under settings, and then MultiCamera Settings. If you enter the IP address under camera 1, then once you finish up click the Camera1 button. You should have control of your camera. Pressing the View, then advanced view, will bring up the speed, OSD and exposure control.

Using the Dockable Controllers
The Dockable controllers are another form of camera control that you can do from within the actual GUI of OBS. You can set one of these up per camera and place them into your queue as in the pic below. While this is an option, it can be hard to get fine control. We do see a lot of customers using this though so I wanted to be sure to mention it here. You can find the Dockable OBS controllers if you go through the process to download the OBS app, the dockable controllers are another link there.